Aloe Vera and Cinnamon Remedy: Natural Benefits for Eye Health, Immunity, and Healing
Garden Healthy 01/10/2025 23:44
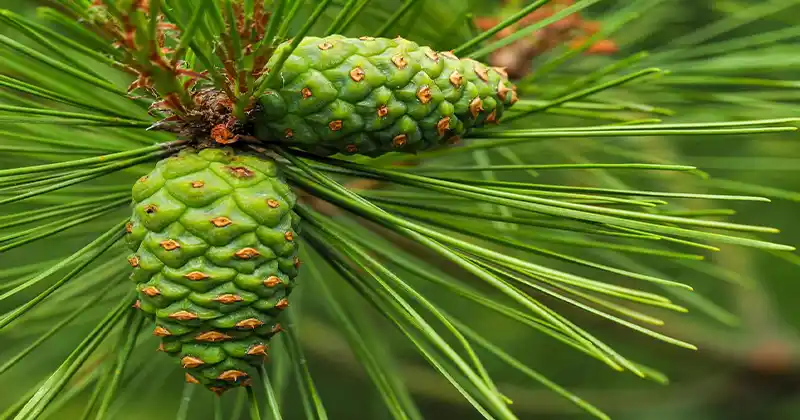
Pine cone syrup is a traditional homemade syrup made from immature, soft pine cones—those that you can easily slice with a knife or press with your fingers. These cones release fragrant compounds, mild bitterness, and a natural color when combined with sugar, resulting in a syrup that tastes like honey met the forest.
Important: Only use cones from true pines (genus Pinus). Do not confuse pine with yew (Taxus baccata, toxic) or poison hemlock (a herbaceous plant, not a tree). If you're unsure about identification, it's best to avoid harvesting.
1. Soothing for Throat and Cough
Traditionally, pine cone syrup has been used in warm water or tea to ease throat scratchiness and occasional cough. It provides a gentle remedy for discomfort.
2. Aromatics for Easy Breathing
Pine’s volatile compounds, such as α-pinene, provide that refreshing, head-clearing aroma many people love in steamy drinks. It’s perfect for clearing the airways.
3. Mild Expectorant Feel
Folk remedies suggest that pine cone syrup can help loosen stubborn mucus when taken warm (e.g., stirred into hot water). This makes it a helpful remedy for easing congestion.
4. Comforting Warm-Up
A spoonful of pine cone syrup in hot water or milk can create a calming, cozy drink perfect for warming up on cold evenings.
5. Gentle Digestive Lift
The mild bitterness of pine cone syrup can help after heavy meals by supporting digestion, making it a useful addition to a post-dinner routine.
6. Mood & Ritual
The forest-like scent and the slow ritual of making and using pine cone syrup can be grounding and pleasant, promoting mindfulness and relaxation.
7. Culinary Superpower
Pine cone syrup is a unique sweetener for desserts, glazes, salad dressings, cocktails, coffee, and tea, offering a woodland-inspired flavor profile.
8. Antioxidant Notes
Pine parts contain polyphenols and vitamin C, and while your syrup won’t be a vitamin pill, it does carry some plant-based goodness.
Not Medical Advice: Pine cone syrup is a kitchen remedy and a specialty sweetener. If you're experiencing ongoing symptoms or have a medical condition, consult a healthcare professional before using it.
Ingredients (Stovetop Method – Fast):
500 g young green pine cones (soft, 1–3 cm; picked in late spring/early summer)
700 g white sugar (you can blend white and light brown for a deeper flavor)
500 ml water
Optional: 1 lemon (sliced) or 1–2 tsp lemon juice (to balance sweetness); 1 small piece vanilla bean or cinnamon stick for aroma
Gear:
Large bowl, colander, cutting board, knife
Non-reactive pot (stainless steel or enamel)
Spoon, fine strainer/cheesecloth
Clean, sterilized bottles or jars with lids
Kitchen scale (highly recommended)
Choose the right cones:
Look for immature, green, soft cones that you can cut through. Hard, brown, woody cones are past their prime for syrup-making.
Ethical picking:
Take only a modest amount from multiple trees. Avoid protected areas, and get permission if needed.
Clean carefully:
Shake off insects or debris. Rinse briefly in cool water and pat dry. Avoid soaking the cones for too long, as the aroma resides in the resin.
This method is the easiest for beginners and gives you a syrup quickly.
Instructions:
Cut or halve the cones (optional): If they’re small and soft, leave them whole. Otherwise, halving exposes more surface area and speeds up the extraction process.
Simmer the cones: Add the cones and 500 ml of water to the pot. Bring it to a gentle simmer (not a rolling boil) for 30–40 minutes, partially covered.
Strain the pine "tea": After simmering, remove from heat and strain through a fine sieve or cheesecloth to get a clear, fragrant liquid. Discard the cones.
Make the syrup: Return the liquid to the pot, add 700 g of sugar (and lemon slices or juice if desired), and stir to dissolve over low heat. Simmer for 10–15 minutes, skimming foam. If you have a thermometer, heat to 103–105 °C (syrup stage).
Bottle safely: Funnel the hot syrup into sterilized, warm jars, leaving about 1 cm of headspace. Seal and let it cool to room temperature before storing in a cool, dark place.
Yield & Texture:
This method yields about 600–800 ml of pourable, amber syrup with a resin-honey aroma.
This traditional method takes more time but rewards you with a syrup that has a more complex, slightly caramelized flavor.
Instructions:
Layer & sugar (cold extraction): In a clean jar, layer dry green cones with sugar in a 1:1 ratio by weight (e.g., 500 g cones + 500 g sugar), ending with a layer of sugar. Optionally, add a few lemon slices between layers.
Sun the jar: Seal the jar and place it on a sunny windowsill for 2–6 weeks. Over time, the sugar dissolves, drawing out the resin and juices, turning the mix into syrup and darkening it.
Strain & finish: Strain the thick syrup through cheesecloth. For stability, gently heat the syrup for 5–10 minutes (optional but recommended), then bottle in sterilized jars.
Pros: Deeper flavor, more complex perfume.
Cons: Takes weeks, requires patience.
Honey-Based Version:
Swap sugar for mild honey in Method 2. Do not cook honey; just macerate and refrigerate. Avoid honey for children under 1 year.
Spiced Syrup:
Add vanilla, cinnamon, or juniper berries during simmering; strain out before bottling.
Citrus Lift:
Lemon or orange peel (without the pith) can brighten the flavor.
By the spoon: Take 1–2 teaspoons as an occasional throat soother.
Warm drinks: Stir into tea or hot water with lemon. Great in black tea, herbal blends, or warm milk.
Breakfast: Drizzle over pancakes, waffles, yogurt, granola, or porridge.
Desserts: Brush on cakes, swirl into ice cream, or glaze baked apples/pears.
Savory glazes: Mix with a splash of vinegar or soy to glaze roast veggies, grilled meats, or baked salmon.
Salad dressings: Whisk with olive oil, vinegar, salt, and mustard for a forest-fragrant vinaigrette.
Cocktails & mocktails: Replace simple syrup in Old Fashioneds, sours, or spritzers to add a woodland note.
Stovetop sugar syrup:
Sealed and stored in a cool, dark place, it keeps for 6–12 months. Once opened, refrigerate and use within 2–3 months.
Sun-macerated or honey version:
Keep refrigerated. Use within 2–3 months.
Spoilage signs: Mold, fizzing, or off smells—discard if any appear.
Too runny: Simmer a few minutes longer (aim for 103–105 °C). Remember, it thickens as it cools.
Too thick/crystallized: Stir in a little hot water and re-warm gently to dissolve crystals.
Cloudy syrup: Usually harmless; fine-filter through cheesecloth.
Bitter taste: Cones may have been too mature or over-simmered. Balance with a touch more lemon or a pinch of salt.
Very dark syrup: Normal for long macerations; flavor will be deeper and slightly caramelized.
Allergies/asthma: Pine aromatics can be irritating for some. Start with a small amount.
Pregnancy/breastfeeding & medical conditions: Check with a professional before regular use.
Diabetes/low-sugar diets: Pine cone syrup is sugary—use sparingly or consult a professional.
Kids: Avoid honey versions under age 1. For sugary syrups, keep portions small.
Identification matters: Use true pines (Pinus). Avoid yew and other unknown conifers.
Best cones: Tiny, soft, green; cuttable with a knife.
Fast method ratio: ~500 ml water + 700 g sugar per 500 g cones.
Simmer time: 30–40 min (cones in water), then 10–15 min (with sugar).
Temp target: 103–105 °C for syrup stage.
Storage: Cool/dark sealed for 6–12 months (sugar syrup); refrigerate after opening.
Pine cone syrup brings the essence of the forest into your kitchen—comforting in hot tea, exciting on desserts, and cherished by many for generations. Try the quick stovetop method for instant satisfaction, or elevate your syrup-making skills with the slow, sun-macerated version. Happy syrup-making!