Tips 03/11/2025 13:45
You are doing it all wrong. Here's the right way to clean your fridge
Cleaning your fridge is one of those household chores that often slips down the to-do list until it becomes impossible to ignore. Many of us are guilty of hurriedly wiping up a spill or throwing away expired leftovers, but rarely do we dedicate the time for a proper, deep clean. Yet, keeping your refrigerator spotless and well-organized isn’t just about appearances—it’s crucial for maintaining the freshness of your food, extending the life of the appliance, and safeguarding your family’s health.
With a clear plan and the right techniques, fridge cleaning doesn’t have to be a dreaded task. In this guide, we’ll walk through common mistakes people make when cleaning their refrigerators and show you a step-by-step method to do it efficiently and safely. From emptying the shelves to using natural, non-toxic cleaners, these practical tips will help you achieve a fridge that’s as fresh-smelling as it is functional.
1. Empty the Fridge Completely
Start by removing everything from your fridge—yes, even the condiments and half-empty jars hiding in the door. Clearing it out completely gives you access to every corner and surface that needs attention. As you go, check expiration dates and toss anything that’s spoiled, discolored, or long past its prime.
This is also a great time to take inventory of what you have. Group similar items together—such as sauces, beverages, or produce—so that restocking later will be faster and more organized. Having a clear workspace also helps you see any spills, crumbs, or stains you might otherwise miss.
2. Remove Shelves and Drawers for a Deep Clean
Next, carefully slide out all removable shelves, drawers, and bins. Modern refrigerators are designed for easy disassembly, so don’t hesitate to take these parts out for a thorough wash.
Soak them in warm, soapy water for 10–15 minutes to loosen stubborn grime or sticky residue. For glass shelves, let them adjust to room temperature before washing to prevent cracking from sudden temperature changes. Once clean, rinse thoroughly and allow them to air dry completely on a towel.
3. Clean the Interior with a Vinegar Solution
Now, turn your attention to the inside of the fridge. Mix equal parts white vinegar and warm water in a spray bottle for a safe, natural cleaning solution. Vinegar effectively cuts through grease, disinfects surfaces, and neutralizes unpleasant odors.
Spray the mixture onto the walls, ceiling, and door compartments, then wipe with a soft cloth or sponge. For stubborn spots, let the solution sit for a few minutes before wiping. Don’t forget the corners and seams—these are often where crumbs and sticky spills hide.
4. Avoid Harsh Chemical Cleaners
When cleaning a food storage area, it’s best to skip harsh chemical cleaners altogether. They can leave behind strong smells and residues that may contaminate food or affect its taste. Stick with natural alternatives like vinegar or a mild baking soda solution.
If you must use a commercial cleaner, ensure it’s labeled food-safe and rinse surfaces thoroughly afterward. A simple rule of thumb: if you wouldn’t want it near your food, don’t use it in your fridge.
5. Use Baking Soda to Deodorize Naturally
After you’ve finished cleaning, place an open box or small bowl of baking soda on a middle shelf. Baking soda naturally absorbs and neutralizes odors, keeping your fridge smelling fresh for weeks.
For an extra deodorizing boost, sprinkle a little on a damp sponge and gently scrub the interior surfaces before your final wipe-down. Replace your baking soda every three months—or sooner if you notice odors returning.
6. Don’t Forget the Door Seals
The rubber seals (or gaskets) around your fridge door play a vital role in maintaining efficiency, but they’re also a hotspot for dirt, mold, and mildew. Dip an old toothbrush into your vinegar solution and scrub along the folds of the gasket to remove buildup.
Clean seals help your fridge maintain a proper temperature, reduce energy waste, and prolong the life of the appliance. After cleaning, dry the seals thoroughly to prevent moisture from encouraging mold growth.
7. Organize by Category When Restocking
Once your fridge is clean and dry, it’s time to put everything back strategically. Group items by category—dairy, meat, produce, condiments, beverages, etc.—so you can easily locate what you need.
Use clear containers or labeled bins to store smaller items and leftovers. Place foods that need to be consumed soon at the front so they don’t get forgotten. An organized fridge not only looks neat but also helps reduce food waste and saves time during meal prep.
8. Check Expiration Dates Before Refilling
Before returning anything to the fridge, take a moment to double-check expiration dates and freshness. Items that have been sitting at the back for months may no longer be safe to eat.
Creating a habit of checking dates once a week—perhaps during grocery day—helps keep your fridge free of spoiled or forgotten foods, ensuring that everything inside is both safe and appetizing.
9. Ensure Everything is Completely Dry
Moisture is your enemy when it comes to keeping your fridge clean. Before reinstalling shelves or drawers, make sure they’re completely dry. Any leftover moisture can lead to mold or unpleasant smells over time.
Wipe all interior surfaces again with a clean, dry microfiber cloth and allow them to air dry for a few minutes before reassembling.
10. Use Drawer Liners for Easy Maintenance
To make future cleaning easier, consider placing reusable drawer liners or washable mats in the vegetable and snack drawers. These liners catch crumbs and spills, allowing you to simply lift and rinse them instead of scrubbing stuck-on messes later.
Choose liners that are non-toxic and food-safe, and replace or clean them regularly to maintain freshness.
11. Schedule Regular Cleanings for Long-Term Freshness
Finally, remember that a single deep clean isn’t enough to keep your fridge in top shape. Plan to give your refrigerator a thorough cleaning every three months, with light touch-ups in between. Wipe spills as soon as they happen, and take a few minutes each week to reorganize or remove expired items.
Consistent maintenance not only keeps your fridge smelling and looking great but also helps it run more efficiently—saving you money on energy costs and preventing mechanical wear.
Final Thoughts
A clean fridge is more than just an aesthetic win—it’s a reflection of a healthy and organized home. With a bit of effort and routine care, you can turn this often-overlooked appliance into a fresh, efficient, and pleasant space for your food.
So, set aside some time this weekend, grab your vinegar and baking soda, and give your refrigerator the attention it deserves. Your future self—and your leftovers—will thank you.
News in the same category

My nana taught me this hack to get rid of lawn burn from dog pee in 5 mins with 0 work. Here’s how it works
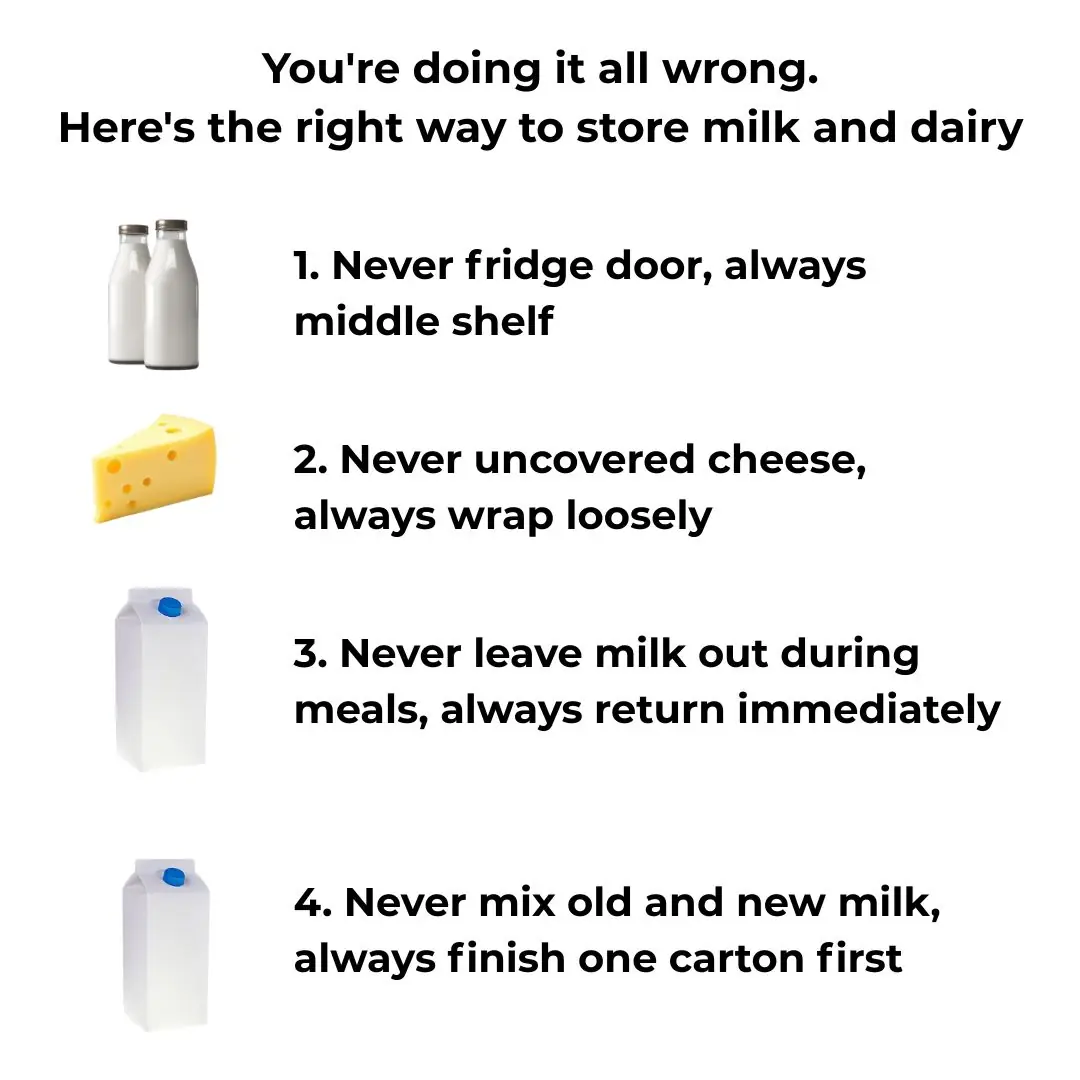
You're doing it all wrong. Here’s the right way to store milk and dairy
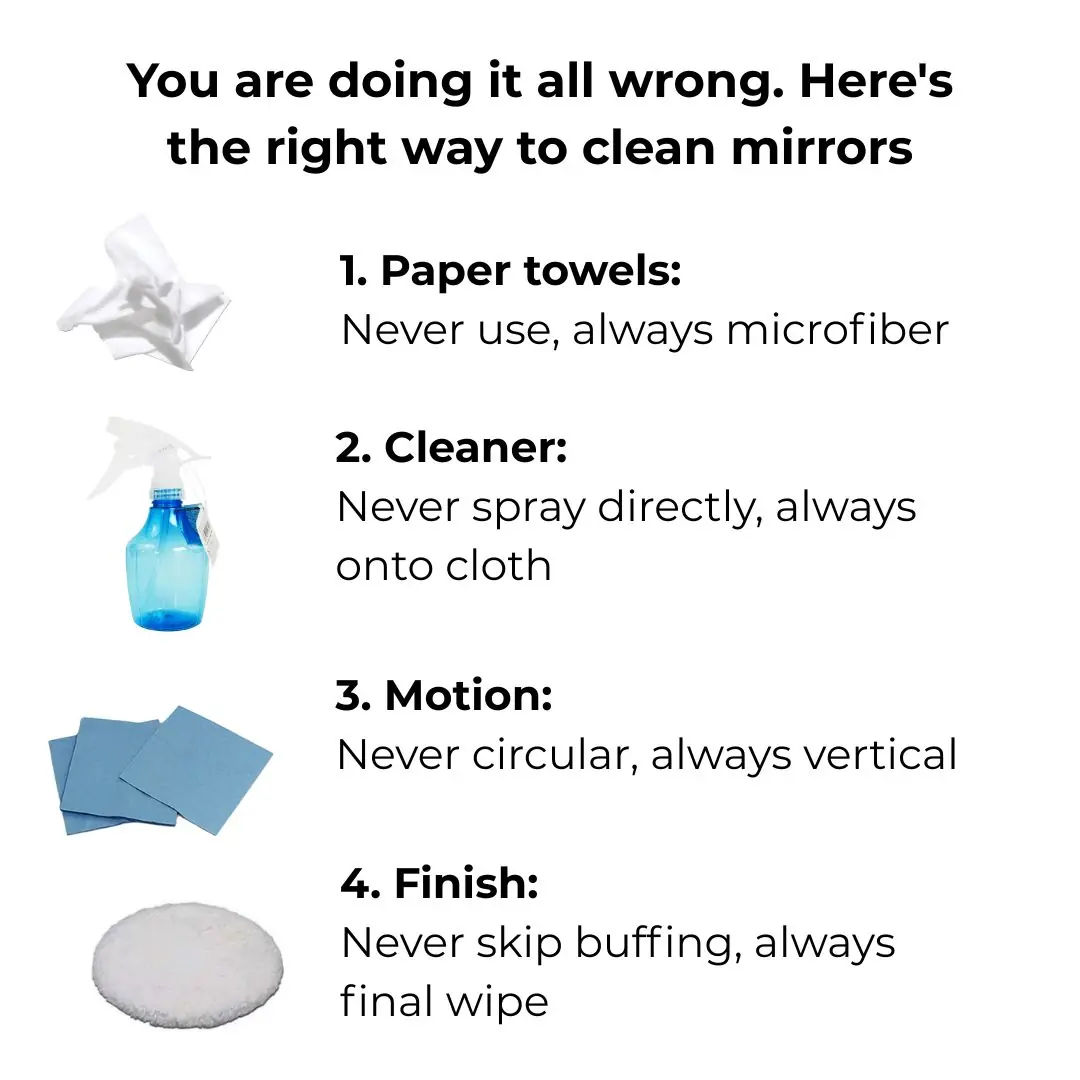
You are doing it all wrong. Here's the right way to clean mirrors
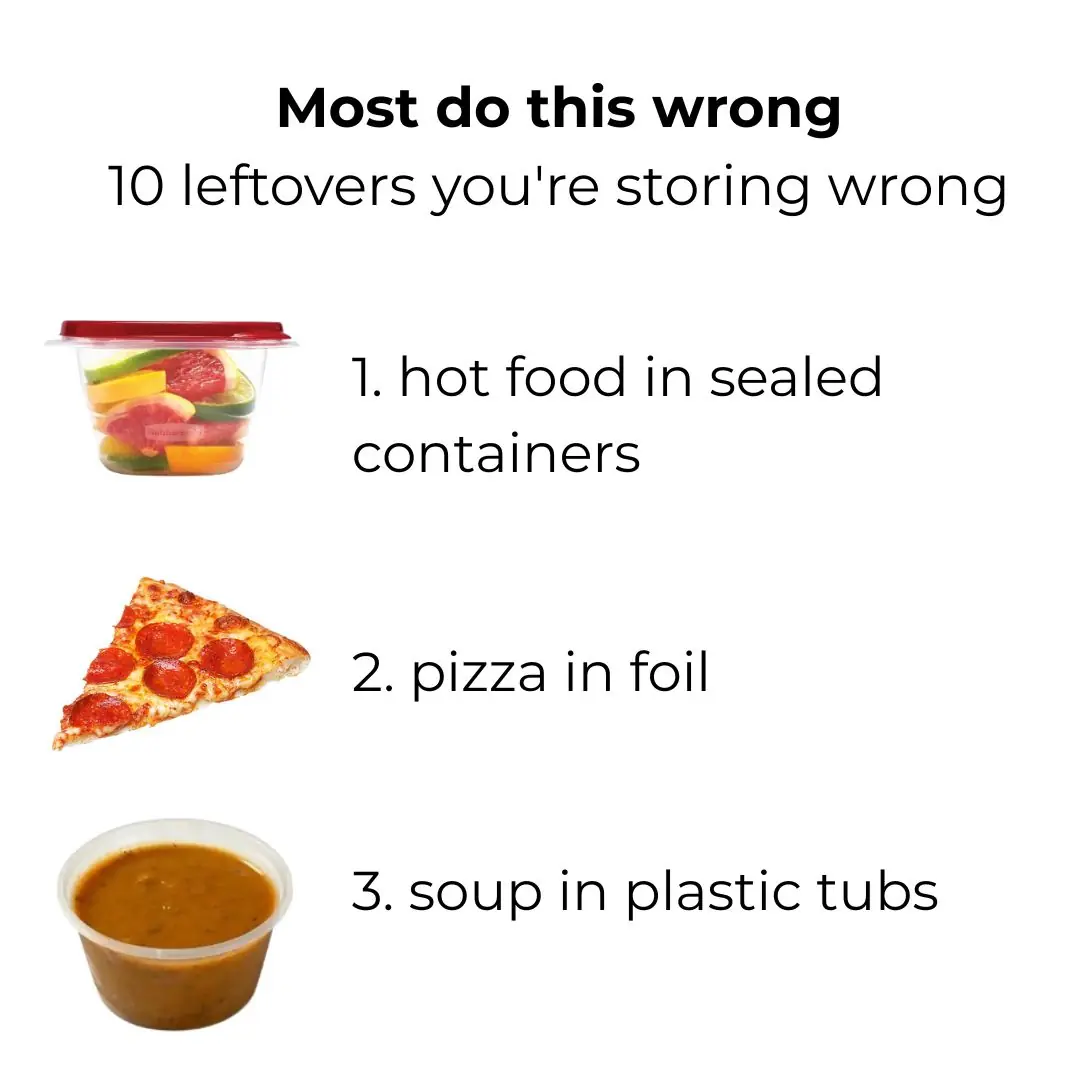
Most do this wrong. 10 leftovers you’re storing wrong

Delicious and crispy onion salt, you can keep it all year round without worrying about scum, just make it this way, whoever eats it will remember it forever
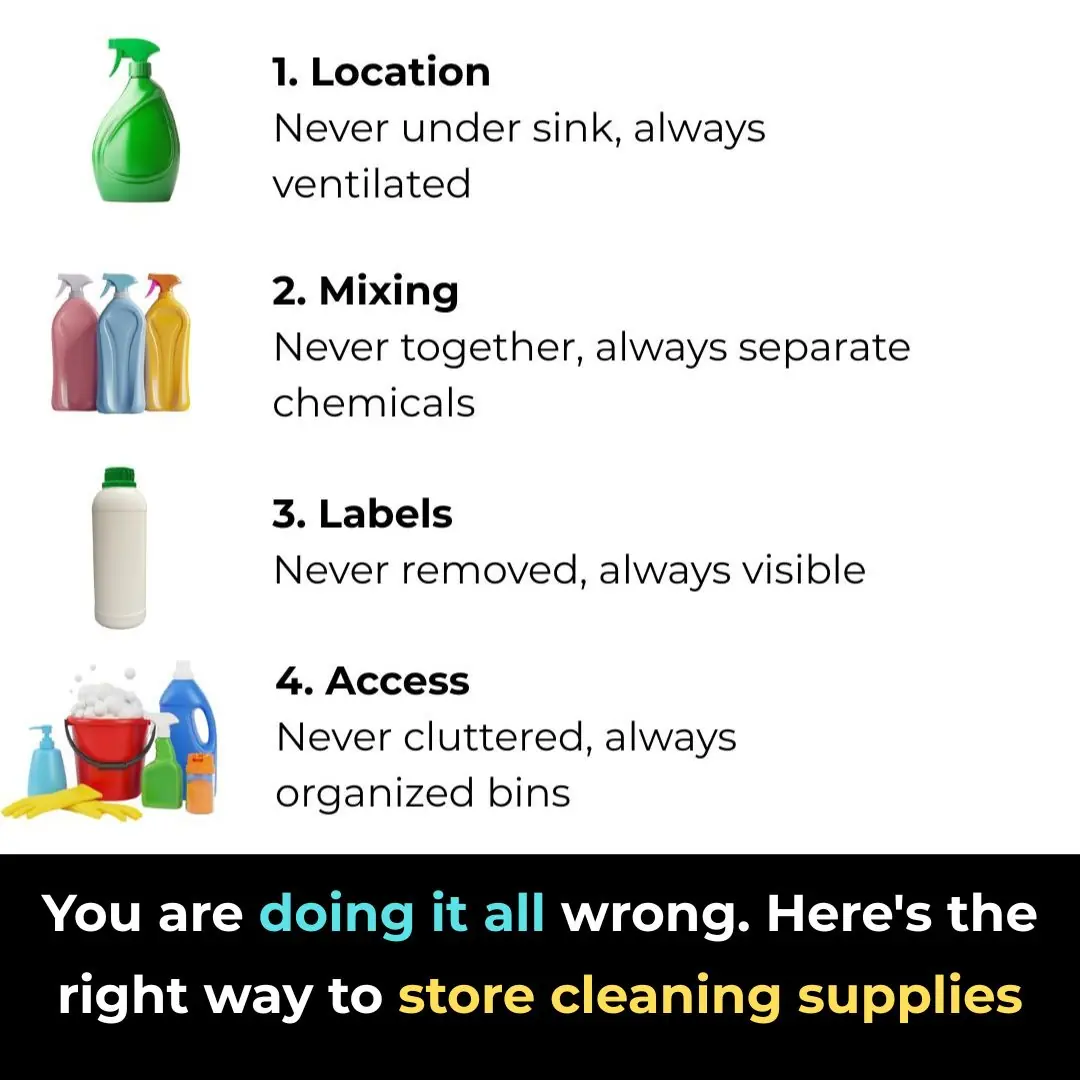
You are doing it all wrong. Here's the right way to store cleaning supplies

My nana taught me this hack to whiten yellow pillows in 5 mins with 0 work. Here’s how it works

If you see this plant, you are sitting on gold and don't even know it.

The truth about eating green papaya and ripe papaya is a secret that few people know

The 'green miracle' fruit that fights cancer and treats diabetes but is overlooked by many: Sold widely in Vietnamese markets

How to wash and condition hair with rice water to reduce hair loss and continuously promote new hair growth

4 dishes using hairleaf herb to effectively treat stomach pain

5 Warning Signs That Could Indicate a Serious Illness — Check Yourself and Your Loved Ones
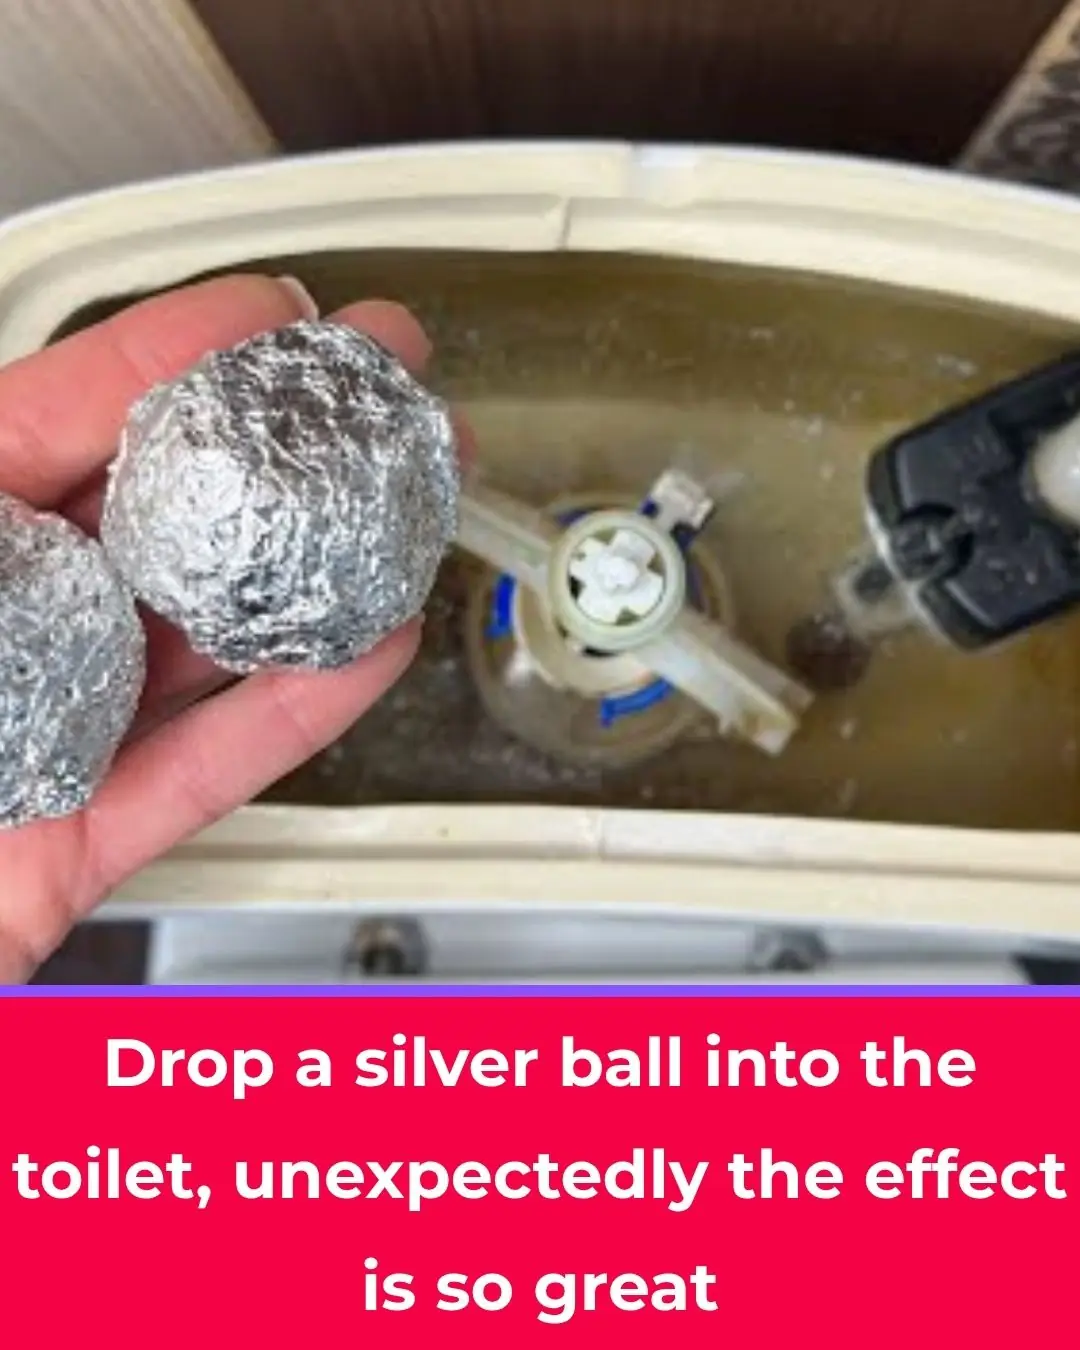
Drop a Silver Ball into Your Toilet — You’ll Be Amazed at What Happens Next

Don’t Eat Tofu Right After You Buy It—Freeze It First for a Magical Effect
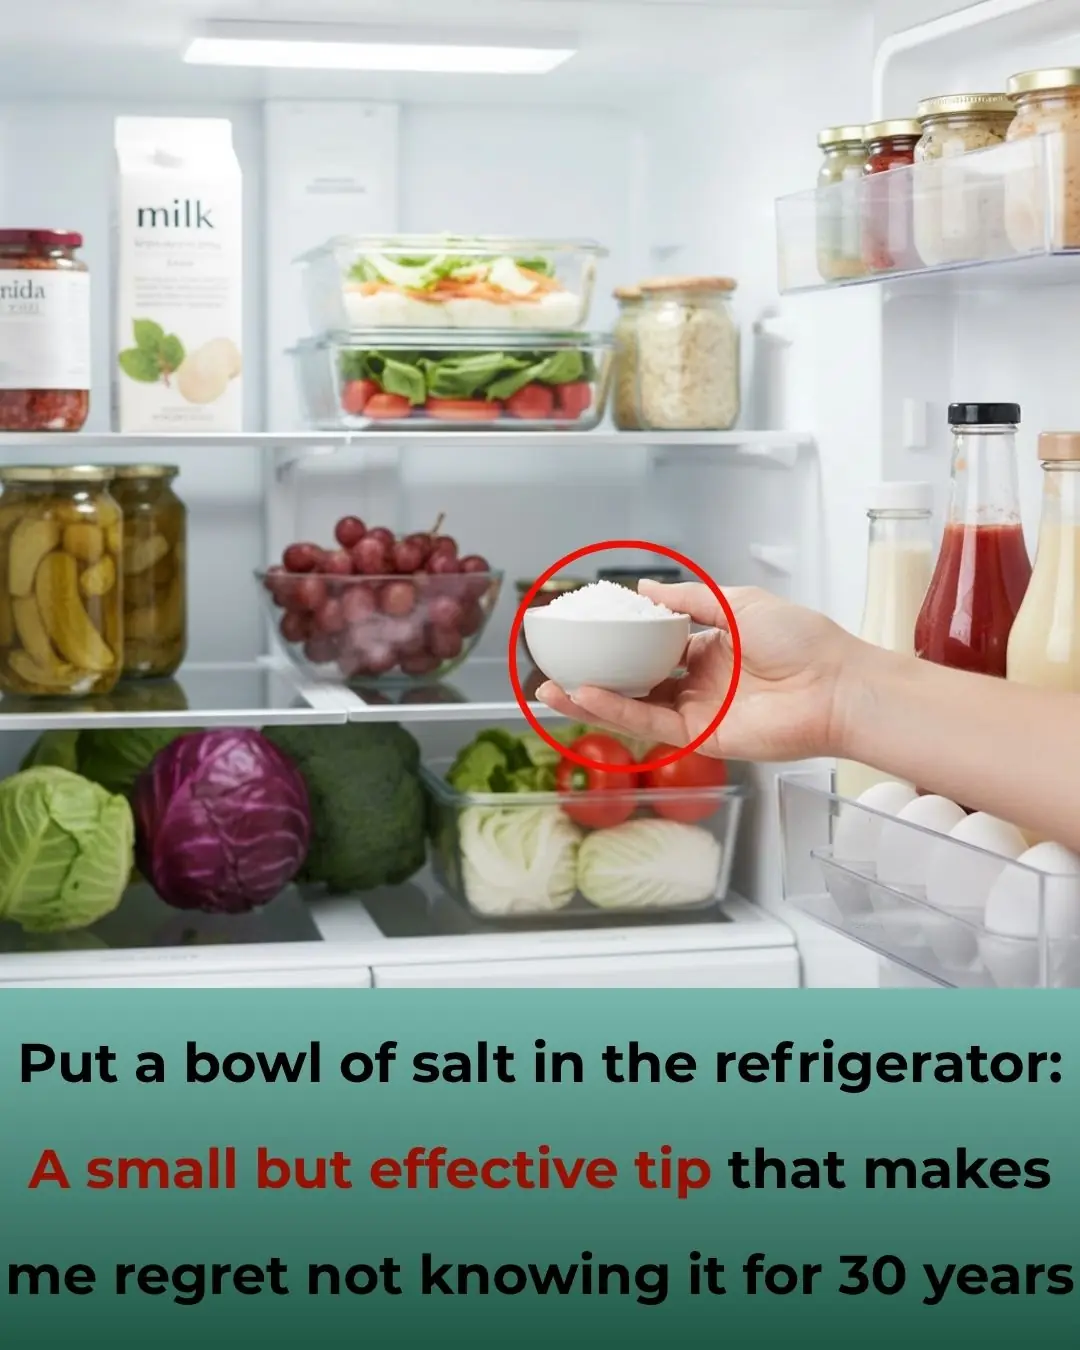
Put a Bowl of Salt in Your Fridge: A Simple Yet Powerful Hack I Wish I Knew 30 Years Ago

4 Nighttime Habits That Make Women Age Faster and Shorten Lifespan: How Many Do You Do?
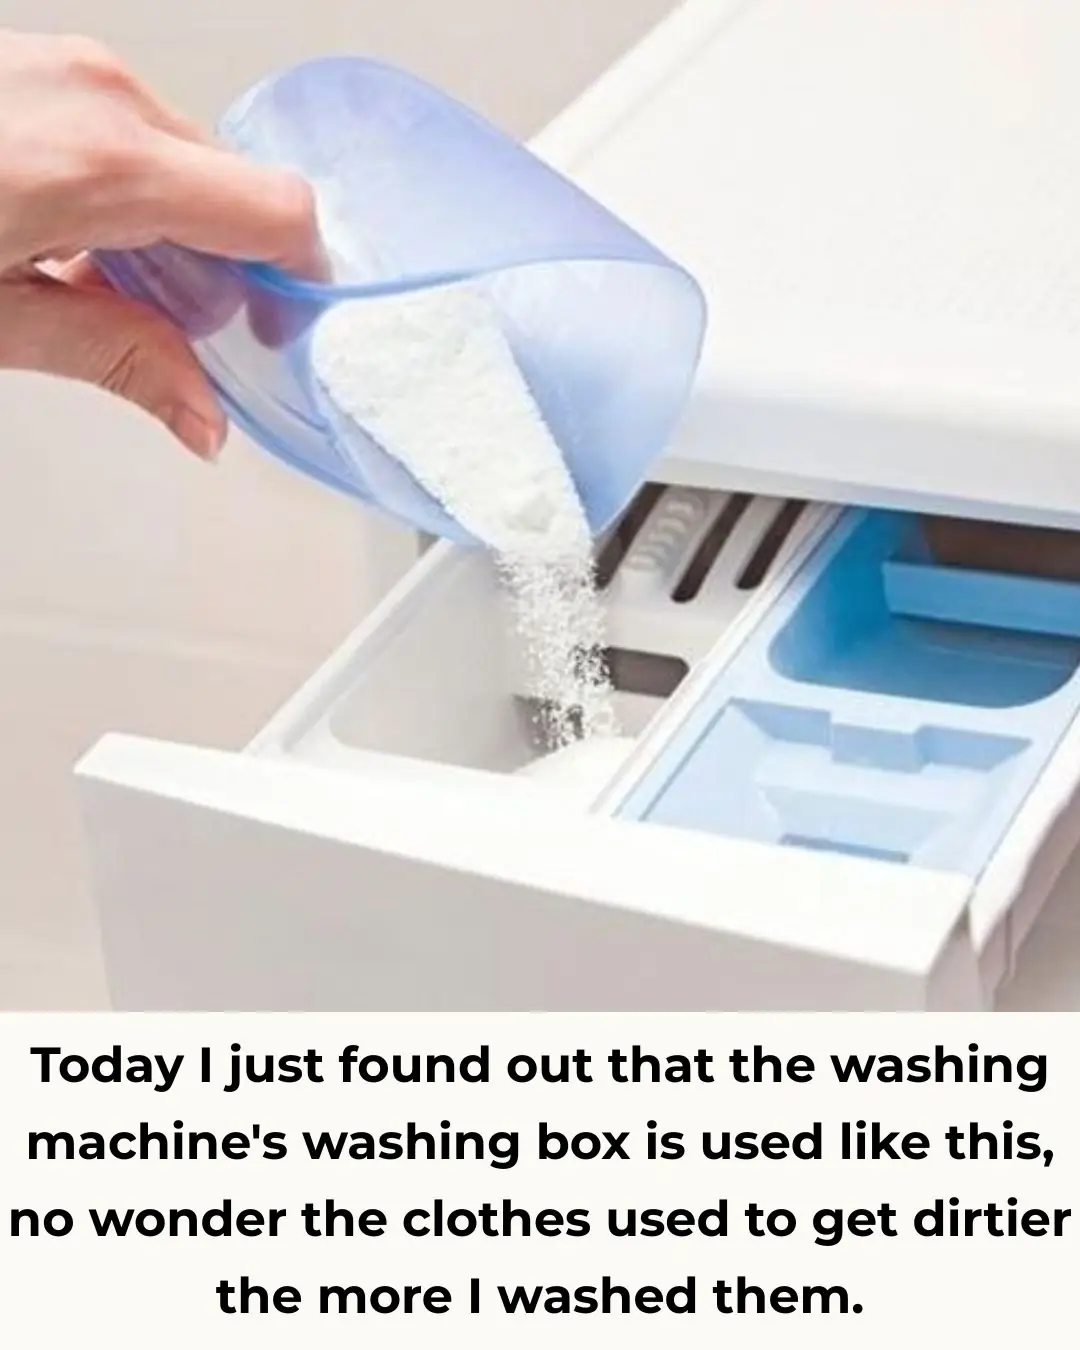
Today I Learned the Right Way to Use the Washing Machine Detergent Drawer — No Wonder My Clothes Used to Get Dirtier After Washing!
News Post

Stop throwing out old hoses. Here are 10 brilliant hacks to use them around the house
Tips 03/11/2025 21:00

Shaun Wallace’s heartbreak over tragic family death: ‘I watched him physically degenerate’
News 03/11/2025 20:48

EXCLUSIVE: Kerry Katona 'upset' over 'selfish' Katie Price as cracks show in friendship
News 03/11/2025 20:39
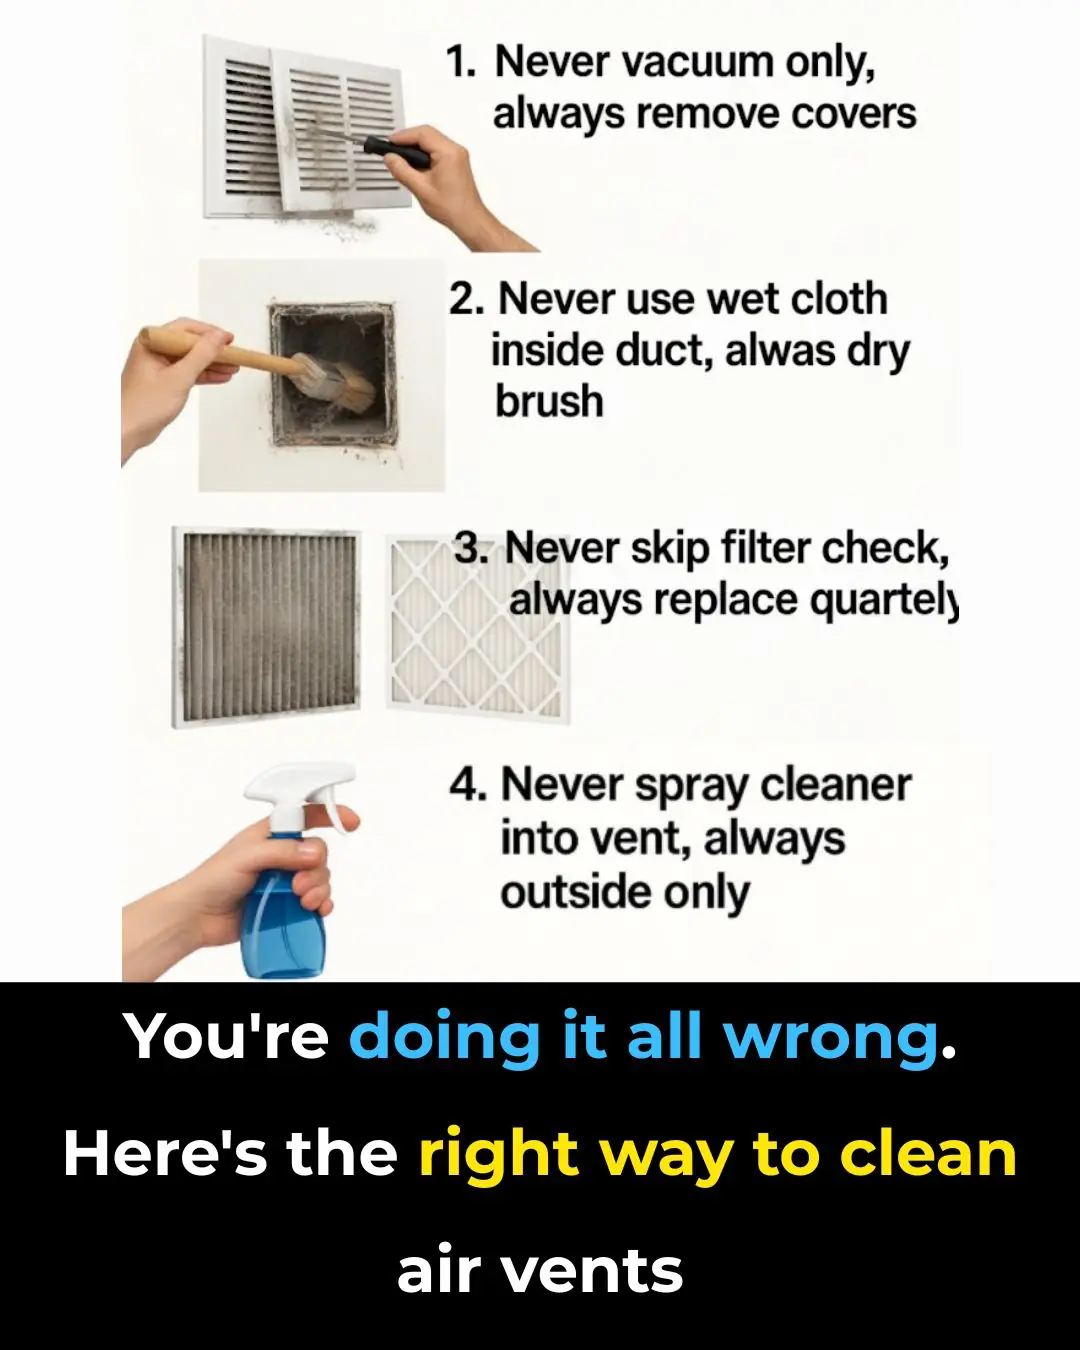
You’re doing it all wrong. Here’s the right way to clean air vents
Tips 03/11/2025 20:23

Big Brother fans fume ‘she can't get away with this’ as they slam housemate
News 03/11/2025 20:23
My nana taught me this hack to get rid of lawn burn from dog pee in 5 mins with 0 work. Here’s how it works
Tips 03/11/2025 20:01
You're doing it all wrong. Here’s the right way to store milk and dairy
Tips 03/11/2025 19:59
You are doing it all wrong. Here's the right way to clean mirrors
Tips 03/11/2025 19:57
Most do this wrong. 10 leftovers you’re storing wrong
Tips 03/11/2025 19:51
Delicious and crispy onion salt, you can keep it all year round without worrying about scum, just make it this way, whoever eats it will remember it forever
Tips 03/11/2025 19:48
You are doing it all wrong. Here's the right way to store cleaning supplies
Tips 03/11/2025 19:45
My nana taught me this hack to whiten yellow pillows in 5 mins with 0 work. Here’s how it works
Tips 03/11/2025 19:42

3 ultimate recipes using Vaseline & lemon to erase dark spots, clear acne and glow skin
Beatuty Tips 03/11/2025 19:35

These Seeds Can Do Magic On Your Hair
Beatuty Tips 03/11/2025 19:34

12 Fruit Trees You Must Prune in August — and the Science Behind It
News 03/11/2025 19:34

Achieve Glass Skin in Just 1 Week: Your Ultimate Guide to Radiant, Smooth, and Flawless Skin
Beatuty Tips 03/11/2025 19:34

Fermented Rice Water & Cloves Scalp Treatment
Beatuty Tips 03/11/2025 19:33

Easy Guide to Using Rice Water for Hair Growth: Natural Solutions for Stronger, Shinier, and Healthier Hair
Beatuty Tips 03/11/2025 19:33

10 DIY Beauty Ice Cubes for Glowing Skin, Acne, and Anti-Aging
Beatuty Tips 03/11/2025 19:33

If You Find This Snake in Your Yard, Don’t Harm It — Here’s Why
News 03/11/2025 19:31